Neither GenericXmlContextLoader nor AnnotationConfigContextLoader was able to detect defaults for context configuration
Posted by phaneendra in Junit on April 6, 2014
Problem: Running JUnit 4 with Spring 3 and getting below exception
Neither GenericXmlContextLoader nor AnnotationConfigContextLoader was able to detect defaults for context configuration
Solution: Add locations attribute to the contextConfiguration.
@ContextConfiguration(locations = {“classpath:applicationContext.xml”}) for the JUnit to refer to the beans Definition.
How to search a string in clob column in oracle
Posted by phaneendra in Oracle on June 29, 2013
Problem: How to search for a string in a CLOB Column
Solution: Suppose you have a table with a CLOB column and you want to search for an occurence of the string in the clob column, you can do like
SELECT *FROM TABLE_NAME WHERE DBMS_LOB.INSTR(CLOB_COLUMN_NAME, ‘SEARCHSTRING’,1,1)>0
Replace with your table name, CLOB Column name in the table and with the actual search string.
ORA-04091:table is mutating, trigger/function may not see it
Posted by phaneendra in Oracle on June 29, 2013
Problem: ORA-04091:table is mutating, trigger/function may not see it
Solution: There are various solutions to solve this, however it requires deeper understanding on what mutating error is and how to resolve this. You will encounter this when working on a trigger for a particular table and the trigger code is accessing the same table on which the trigger is operating on.
Simple solution is to remove references to any usage of the table on which trigger is operating on, if at all possible. How ? Go on…
If you have a ORDER table that has ORDER_ID AND CUSTOMER_ID AND LAST_UPDATED
An ORDER_DETAILS table with ORDER_ID,ORDER_DETAILS.
Suppose the trigger is on the ORDERS table FOR EACH ROW and BEFORE UPDATE. Trigger is to update the ORDER_DETAILS table for a particular existing order along with updating the timestamp in ORDERS table. To do so, if you try to access the ORDER_DETAILS as below, you will end up with mutating error, as in
SELECT ORDER_DETAILS INTO DETAILS
FROM ORDERS O, ORDER_DETAILS OD
WHERE O.ID = OD.ID AND O.ID = :OLD.ID
I have added some reference down below to understand :NEW and :OLD for those who want to understand how to use them in triggers. In the above query, problem is trigger is on ORDERS table and trigger is also trying to access the ORDERS table. Here there is no need to access ID from ORDERS table to join with ORDER_DETAILS Details.
Instead, simplify the query by removing the references to ORDERS table to avoid mutating error
SELECT ORDER_DETAILS INTO DETAILS
FROM ORDER_DETAILS OD
WHERE OD.ID = :OLD.ID
Identifying scenarios like this before dwelling into complex solutions will save time 🙂
Accessing Column Values in Row Triggers
Within a trigger body of a row trigger, the PL/SQL code and SQL statements have access to the old and new column values of the current row affected by the triggering statement. Two correlation names exist for every column of the table being modified: one for the old column value, and one for the new column value. Depending on the type of triggering statement, certain correlation names might not have any meaning.
- A trigger fired by an
INSERTstatement has meaningful access to new column values only. Because the row is being created by theINSERT, the old values are null. - A trigger fired by an
UPDATEstatement has access to both old and new column values for bothBEFOREandAFTERrow triggers. - A trigger fired by a
DELETEstatement has meaningful access to :oldcolumn values only. Because the row no longer exists after the row is deleted, the :newvalues areNULL. However, you cannot modify :newvalues:ORA–4084is raised if you try to modify :newvalues.
The new column values are referenced using the new qualifier before the column name, while the old column values are referenced using the old qualifier before the column name. For example, if the triggering statement is associated with the Emp_tab table (with the columns SAL, COMM, and so on), then you can include statements in the trigger body. For example:
IF :new.Sal > 10000 ...
IF :new.Sal < :old.Sal ...
java.sql.SQLException: Protocol violation
Posted by phaneendra in Java on June 29, 2013
Problem: Getting SQL Exception java.sql.SQLException: Protocol violation
Solution: I had researched various available solutions for this issue, however none of them solved my issue. I will first summarize some available solutions before presenting what solved the problem in a different way
Solution 1: DB password was showing an error ORA-28002: the password will expire within XX day. Reseting the password resolves the issue
Solution 2: use 64 bit VM. To use 64 bit VM pass argument -d64 as command line parameter to Java.
Solution 3: In My case, its the JVM Settings. Increasing the -Xmx<size> set maximum Java heap size
Increasing from -Xmx512M to -Xmx1024M resolved the issue as well
Failed to load Main-Class manifest attribute from….
Posted by phaneendra in Java on March 23, 2013
Problem: “Failed to load Main-Class manifest attribute from” error while trying to call main class bundled in a jar file.
Below is the documentation from oracle related to the above error, but i will also show you how do to do this in case if you are using build tool like maven to bundle your jar file.
Setting an Application’s Entry Point
If you have an application bundled in a JAR file, you need some way to indicate which class within the JAR file is your application’s entry point. You provide this information with the Main-Class header in the manifest, which has the general form:
Main-Class: classname
The value classname is the name of the class that is your application’s entry point.
Recall that the entry point is a class having a method with signature public static void main(String[] args).
After you have set the Main-Class header in the manifest, you then run the JAR file using the following form of the java command:
java -jar JAR-name
The main method of the class specified in the Main-Class header is executed.
An Example
We want to execute the main method in the class MyClass in the package MyPackage when we run the JAR file.
We first create a text file named Manifest.txt with the following contents:
Main-Class: MyPackage.MyClass
Warning: The text file must end with a new line or carriage return. The last line will not be parsed properly if it does not end with a new line or carriage return.
We then create a JAR file named MyJar.jar by entering the following command:
jar cfm MyJar.jar Manifest.txt MyPackage/*.class
This creates the JAR file with a manifest with the following contents:
Manifest-Version: 1.0
Created-By: 1.7.0_06 (Oracle Corporation)
Main-Class: MyPackage.MyClass
When you run the JAR file with the following command, the main method of MyClass executes:
java -jar MyJar.jar
Setting an Entry Point with the JAR Tool
The ‘e’ flag (for ‘entrypoint’), introduced in JDK 6, creates or overrides the manifest’s Main-Class attribute. It can be used while creating or updating a JAR file. Use it to specify the application entry point without editing or creating the manifest file.
For example, this command creates app.jar where the Main-Class attribute value in the manifest is set to MyApp:
jar cfe app.jar MyApp MyApp.class
You can directly invoke this application by running the following command:
java -jar app.jar
If the entrypoint class name is in a package it may use a ‘.’ (dot) character as the delimiter. For example, if Main.class is in a package called foo the entry point can be specified in the following ways:
jar cfe Main.jar foo.Main foo/Main.class

Pom.xml
<plugin>
<groupId>org.apache.maven.plugins</groupId>
<artifactId>maven-jar-plugin</artifactId>
<version>2.3.1</version>
<configuration>
<archive>
<manifest>
<classpathPrefix>target/lib/</classpathPrefix>
<addClasspath>true</addClasspath>
<mainClass>com.MyPackage.MyClass</mainClass>
</manifest>
</archive>
</configuration>
</plugin>
where com.MyPackage.MyClass is the file where the main method exists and classpathPrefix is something where i am expecting some dependant jars to be available. We are interested in mainClass element at this time.
This is how Manifest.MF looks like in META-INF folder inside the jar file
Manifest-Version: 1.0
Archiver-Version: Plexus Archiver
Created-By: Apache Maven
Built-By: username
Build-Jdk: 1.6.0_33
Main-Class: com.MyPackage.MyClass
Class-Path: target/lib/json-20090211.jar
Main-Class described above will help to load the main method.
Axis2 contract-first web service
Posted by phaneendra in Axis2 on March 23, 2013
Installing Axis2 WAR Distribution
- Download the Axis2 WAR distribution from here: http://axis.apache.org/axis2/java/core/download.cgi
- Deploy it as an exploded directory in your preferred Servlet Container (JBoss, Tomcat, etc).
- axis2.war will be the container to hold multiple aar files, which independently are axis projects themselves
- Go to the axis2.war/WEB-INF/conf/axis2.xml file, and set the hotupdate parameter to true, as follows:
| …<parameter name=”hotupdate”>true</parameter>Check that the Axis2 webapp was successfully deployed by going to this link http://localhost:8080/axis2/ and clicking on ‘Validate’. |
Developing a contract-first web service
- Create a Maven project in eclipse.
- Copy your wsdl and xsd files to src/main/resources. Note: This process assumes you already have an existing WSDL file with external xsd files for the messages definition (Contract-first approach)
- Copy the following to your pom.xml file:
| <build><plugins>
<plugin> <groupId>org.apache.axis2</groupId> <artifactId>axis2-aar-maven-plugin</artifactId> <version>1.4.1</version> <extensions>true</extensions> <configuration> <servicesXmlFile>src/main/resources/services.xml</servicesXmlFile> <wsdlFile>src/main/resources/<your-wsdl-file></wsdlFile> <fileSets> <fileSet> <directory>src/main/resources</directory> <outputDirectory>META-INF</outputDirectory> <includes> <include>**/*.xsd</include> </includes> </fileSet> </fileSets> </configuration> </plugin> </plugins> </build> <profiles> <profile> <id>codegen</id> <build> <plugins> <plugin> <groupId>org.apache.axis2</groupId> <artifactId>axis2-wsdl2code-maven-plugin</artifactId> <version>1.6.2</version> <executions> <execution> <phase>generate-sources</phase> <goals> <goal>wsdl2code</goal> </goals> </execution> </executions> <configuration> <classpathElements>${project.build.outputDirectory}</classpathElements> <wsdlFile>src/main/resources/<your-wsdl-file></wsdlFile> <databindingName>adb</databindingName> <packageName><package-name></packageName> <generateServerSide>true</generateServerSide> <generateServerSideInterface>true</generateServerSideInterface> <generateServicesXml>true</generateServicesXml> </configuration> </plugin> </plugins> </build> </profile> </profiles> <dependencies> <dependency> <groupId>org.apache.axis2</groupId> <artifactId>axis2</artifactId> <version>1.6.2</version> </dependency> <dependency> <groupId>org.apache.axis2</groupId> <artifactId>axis2-transport-http</artifactId> <version>1.6.2</version> </dependency> <dependency> <groupId>org.apache.axis2</groupId> <artifactId>axis2-transport-local</artifactId> <version>1.6.2</version> </dependency> <dependency> <groupId>org.json</groupId> <artifactId>json</artifactId> <version>20090211</version> </dependency> </dependencies> |
- To generate the java sources from the wsdl, run: mvn clean generate-sources -Pcodegen. This will create the input and output objects of every service, as well as the skeleton files and the services.xml file.
- Copy the files from target/generated-sources/axis2/wsdl2code/src to your src folder.
- Copy the services.xml file from target/generated-sources/axis2/wsdl2code/src to src/main/resources
- Edit the Skeleton class to include the logic you want.
- To generate the .aar file, run: mvn clean compile axis2-aar:aar
- Copy the generated .aar file from target to testws.war/WEB-INF/services
- WSDL URLhttp://host:port/axis2/services/test-services?wsdl
Bulk convert Office 2003 files to Office 2007
Posted by phaneendra in Microsoft on March 3, 2013
If you would like to convert all your 2003 office documents to 2007, but would like to do all of them in a single shot, here you go.
1. Download Migration Manager from microsoft and install it, which is a free tool
http://www.microsoft.com/en-us/download/details.aspx?id=21888#filelist
2. Download Office compatibility pack
http://www.microsoft.com/en-us/download/details.aspx?id=3
Once step 1 is done, open the folder where it is installed and look for tools\ofc.ini
Below ofc.ini is complete file and we are interested in one part, the path to provide the source folder under [FoldersToConvert], make sure you have this fldr=C:\localfolder (without a ; before fldr and where localfolder is name of your folder)
[FoldersToConvert]
; The Converter will attempt to convert all supported files in the specified folders
; (do not include if specifying FileListFolder)
fldr=C:\localfolder
;fldr=\\server\share\docs
Also you can update DestinationPathTemplate to the path where your converted files need to be available
SourcePathTemplate=*\*\*\
DestinationPathTemplate=C:\Converted
4. Now open cm.exe and navigate to folder where migration manager is installed and simply run the cmd as ofc.exe
all your files will be converted and available in destination provided above without original files getting affected.
Shell Tips
Posted by phaneendra in Unix on January 29, 2013
Specific to CShell……….
1. How to comment multiple lines in shell scripts
:<<COMMENT
Line 1 to be commented
Line 2 to be commented
and so on….
COMMENT
2. How to loop through files in a directory
if (-d $dirpath) then
foreach file (-d $dirpath)
echo $file
end
endif
3. How to get filename from filepath
use basename
basename $dirpath
org.apache.cxf.interceptor.Fault: Unmarshalling Error: Unable to create an instance of scala.collection.immutable.List
Posted by phaneendra in cxf, scala on December 12, 2012
Problem: Trying to call CXF Service, which is calling scala functions utilizing scala List object and getting the error org.apache.cxf.interceptor.Fault: Unmarshalling Error: Unable to create an instance of scala.collection.immutable.List when calling the CXF service
Solution:
Basically CXF unable to marshall the request to cala List object. Check for the scala function where you are using Scala List object, change it to java.util.List object by explicitly mentioning the List object as java.util.List. Also, in the files where you are doing this,
import scala.collection.JavaConversions._
which works in scala 2.8 and above
How to call stored procedure from solr
Posted by phaneendra in solr, Uncategorized on August 30, 2012
Problem: If you want to take advantage of solr data import handler to index the data, but unable to find a way to call oracle stored procedure or a function, here you go
Solution:
1. First thing to understand is to fill the index of solr, I use the dataimporthandler of solr
2. DataImportHandler does not directly support calling regular stored procedures
3. Instead, create oracle pipelined functions as shown in my earlier post at
https://javatoj2ee.wordpress.com/2012/08/30/oracle-pipelined-table-functions/
4. Now prepare the data-config.xml file as below
Configuring DataSources
Add the tag ‘dataSource’ directly under the ‘dataConfig’ tag, for example.
<dataSource name="jdbcds" type="JdbcDataSource" driver="com.mysql.jdbc.Driver" url="jdbc:mysql://localhost:port/dbname" user="db_username" password="db_password" responseBuffering="adaptive" batchSize="0" autoCommit="true"/>
- The datasource configuration can also be done in solr config xml
- The attribute ‘type’ specifies the implementation class. It is optional. The default value is 'JdbcDataSource'
- The attribute ‘name’ can be used if there are multiple datasources used by multiple entities
- All other attributes in the <dataSource> tag are specific to the particular dataSource implementation being configured.
You might need to download and install the Oracle JDBC Driver in the /lib directory of your Solr installation.
- The data-config.xml used for this example is:
<dataConfig>
<dataSource name="jdbcds" driver="org.jdbc.driver.OracleDriver" url="jdbc:oracle:thin:@hostname:port/dbname" user="sa" password="" responseBuffering="adaptive" batchSize="0" autoCommit="true"/>

<document name="products">
 <entity name="item" datasource="jdbcds" pk="id"  query="SELECT * FROM TABLE(PACKAGE_NAME.PIPELINED_FUNC_NAME)" transformer="RegexTransformer,DateFomatTransformer,TemplateTransformer"
</entity>
</document>
</dataConfig>
oracle pipelined table functions
Posted by phaneendra in Oracle on August 30, 2012
Problem: How to create pipelined table functions in oracle
Solution:
Table functions are used to return PL/SQL collections that mimic tables. They can be queried like a regular table by using the TABLE function in the FROM clause. Regular table functions require collections to be fully populated before they are returned. Since collections are held in memory, this can be a problem as large collections can waste a lot of memory and take a long time to return the first row. These potential bottlenecks make regular table functions unsuitable for large Extraction Transformation Load (ETL) operations. Regular table functions require named row and table types to be created as database objects.
Typically pipelined functions are useful if there is a need for a data source other than a table in a select statement as shown below
SELECT * FROM TABLE(PACKAGE_NAME.PIPELINED_FUNC_NAME)
Lets see how to create a pipelined function
1. If you are defining these in a package, below definitions goes into the spec of the package, first thing is to specify the columns that are returned along with the type of the columns
create or replace PACKAGE package_name
AS
TYPE pipelinedDataRecord IS RECORD (id varchar2(100),firstname CUSTOMER.FIRST_NAME%type);
END package_name
The above definition declares the format of the rows that are returned
2. Add the below collection type for the above defined type
TYPE pipelinedDataRecordCol IS TABLE OF pipelinedDataRecord;
So the entire package declaration looks like
create or replace PACKAGE package_name
AS
TYPE pipelinedDataRecord IS RECORD (id varchar2(100),firstname CUSTOMER.FIRST_NAME%type);
TYPE pipelinedDataRecordCol IS TABLE OF pipelinedDataRecord;
END package_name
3. Now define the body of the package
create or replace PACKAGE BODY package_name
AS
FUNCTION func_name return pipelinedDataRecordCol
PIPELINED IS
out_record pipelinedDataRecord ;
BEGIN
FOR in_record IN(
********select statements goes here********
) LOOP
out_record := in_record;
PIPE_ROW (out_record);
END LOOP;
END func_name;
END package_name;
4. How to call the above pipelined function?
SELECT * FROM TABLE(PACKAGE_NAME.FUNC_NAME);
ORA-00942: table or view does not exist
Posted by phaneendra in Oracle, PL/SQL on August 30, 2012
Problem: You tried to execute an SQL statement that references a table or view that either does not exist, that you do not have access to, or that belongs to another schema and you didn’t reference the table by the schema name.
Solution:
Lets suppose there are two schemas, one for all the tables and one for all the procedures and functions.
1. In order to make it clear, lets name them to be TABLE_SCHEMA and PROC_SCHEMA.
2. TABLE_SCHEMA has your business domain tables, say customer table, address table etc
3. PROC_SCHEMA has the procedures PROC_NAME that access these tables
If you try to connect to proc_schema to execute the procedures, you will get a message ORA-00942: table or view does not exist, even though the tables exist. In this case, proper grant permissions are not provided and synonyms are not created. Follow the below indicative steps to potentially resolve this issue
1. If you are using SQLDeveloper, connect to the proper schema to grant access as described below.
2. First connect to the table_schema where all the tables exists and run the below command
3. grant select,insert,update,delete, references on CUSTOMER to PROC_SCHEMA
4. Now DISCONNECT from TABLE_SCHEMA and connect to PROC_SCHEMA and run the below command to create synonym for the table in PROC_SCHEMA
5. create or replace SYNONYM PROC_SCHEMA.CUSTOMER FOR TABLE_SCHEMA.CUSTOMER
Lets extend the above concept and see what steps to take if we decide to execute the stored procedure PROC_NAME available in PROC_SCHEMA from another schema, say ANOTHER_SCHEMA
1. Connect to PROC_SCHEMA and run the below command
2. grant execute on PROC_SCHEMA.PROC_NAME to ANOTHER_SCHEMA
3. Disconnect from PROC_SCHEMA and connect to ANOTHER_SCHEMA and run the below command
4. create or replace SYNONYM ANOTHER_SCHEMA.PROC_NAME FOR PROC_SCHEMA.PROC_NAME
Also, take a look at the below tutorial, for further explanation
Tools
Posted by phaneendra in Tools on August 30, 2012
Blogging here my favorite list of tools, please add if you know more and are useful on regular basis
1. JEdit – jEdit is a mature programmer’s text editor http://www.jedit.org/
2. Beyond compare -Beyond Compare 3 is the ideal tool for comparing files and folders on your Windows or Linux system. Visualize changes in your code and carefully reconcile them. http://www.scootersoftware.com/
3. WinSCP – Free SFTP,SCP and FTP Client for windows http://winscp.net/eng/download.php
4. Notepad++ Notepad++ is a free (as in “free speech” and also as in “free beer”) source code editor and Notepad replacement that supports several languages. http://notepad-plus-plus.org/
5. cygwin terminal – a collection of tools which provide a Linux look and feel environment for Windows. http://www.cygwin.com/ 6. Stylus studio http://www.stylusstudio.com/
7. SOAPUI soapUI is a free and open source cross-platform Functional Testing solution. With an easy-to-use graphical interface, and enterprise-class features, soapUI allows you to easily and rapidly create and execute automated functional, regression, compliance, and load tests. http://www.soapui.org/
8. Nitroshare – A network file-sharing application that makes sending a file to another machine on the local network as easy as dragging-and-dropping. https://launchpad.net/nitroshare/
9. Virtual CloneDrive – Virtual CloneDrive works and behaves just like a physical CD/DVD drive, however it exists only virtually. Image files generated with CloneDVD or CloneCD can be mounted onto a virtual drive from your hard-disk or from a network drive and used in the same manner as inserting them into a normal CD/DVD drive. http://www.slysoft.com/en/virtual-clonedrive.html
10. Azhagi+ : Native language typing software – http://www.azhagi.com/downloads.html
11. CutePDF: This enables virtually any Windows applications (must be able to print) to convert to professional quality PDF documents – with just a push of a button! http://www.cutepdf.com/
12. Irfanview IrfanView is a very fast, small, compact and innovative FREEWARE (for non-commercial use) graphic viewer for Windows http://www.irfanview.com/
13. WinMerge
How to install jmeter plugins
Posted by phaneendra in JMeter on August 30, 2012
Problem: How to Install additional plug-ins for JMeter, for example if you want to view Response Times vs Threads or Transaction throughputs vs Threads
Solution:
If you do not have Jmeter installed, download Jmeter at http://jmeter.apache.org/download_jmeter.cgi
Download latest JMeter plugins at http://code.google.com/p/jmeter-plugins/
Installation instructions:
To install the JMeter Plugins, you simply have to copy the JMeterPlugins.jar file from JMeterPlugins-VERSION.zip inside JMETER_INSTALL_DIR/lib/ext, for example to c:\jmeter\lib\ext in case of windows installation. Now you can restart your JMeter and see jp@gc-prefixed plugins in menus.
If you plan to use the Servers Monitoring Listener, you must also install the server agent on all servers as described here.
Installation instructions can also be found at http://code.google.com/p/jmeter-plugins/wiki/PluginInstall
Axis2: Deploying webservice onto Axis2
Posted by phaneendra in Axis2, Webservices on January 22, 2012
1. Download Apache Axis2 war distribution and Axis2 Binary distribution as well. Axis2 can be downloaded from
http://axis.apache.org/axis2/java/core/download.cgi In this case, i used Axis2 1.6.1.
2. Download latest tomcat from http://tomcat.apache.org/ and unzip onto c:\tomcatx. Lets assume it is c:\tomcat7
3. Unzip Axis2 war distribution, and copy axis2.war onto C:\tomcat7\webapps
4. open run command and navigate to C:\tomcat7\bin and start the tomcat by typing startup.bat
5. Upon starting the tomcat, you can notice that the axis2.war file that was copied earlier, gets exploded into directory structure. Later on, we want .aar file to be copied to C:\tomcat7\webapps\axis2\WEB-INF\services to deploy a webservice onto the tomcat server
6. Now lets start to build .aar file to be deployed onto the above directory. For this unzip the Axis2 binary distribution and extract it to a directory lets say, c:\axis2161 (i downloaded axis2-1.6.1-bin and named it accordingly)
7. Now, do not forget to set AXIS2_HOME environmental variable to point to C:\axis2161\ and also add %AXIS2_HOME% to the path.
8. Our goal is to deploy the quickstart sample app that gets shipped with Axis2, onto application server.
9. If you do not have ant installed on your machine, download ant from http://ant.apache.org/bindownload.cgi, in our case it is ant apache-ant-1.8.2-bin.zip
10. Set the environmental variable for ant, NOTE: Ant 1.8.2 has an issue with environmental variable setup, setup the system path variable directly as ;C:\ant182\bin;
11. Open run command, cd to c:\axis2161\samples\quickstart
12. quickstart example comes with ant build.xml, run the command ant generate.service. You should see build successful
c:\axis2161\samples\quickstart>ant generate.service
Buildfile: c:\axis2161\samples\quickstart\build.xml
compile.service:
[mkdir] Created dir: c:\axis2161\samples\quickstart\build\classes
[javac] c:\axis2161\samples\quickstart\build.xml:42: warning: ‘includeantrun
time’ was not set, defaulting to build.sysclasspath=last; set to false for repea
table builds
[javac] Compiling 1 source file to c:\axis2161\samples\quickstart\build\clas
ses
[javac] Note: c:\axis2161\samples\quickstart\src\samples\quickstart\service\
pojo\StockQuoteService.java uses unchecked or unsafe operations.
[javac] Note: Recompile with -Xlint:unchecked for details.
generate.service:
[copy] Copying 1 file to c:\axis2161\samples\quickstart\build\classes
[jar] Building jar: c:\axis2161\samples\quickstart\build\StockQuoteService
.aar
[copy] Copying 1 file to c:\axis2161\repository\services
BUILD SUCCESSFUL
Total time: 9 seconds
13. Navigate to URL http://127.0.0.1:8080/axis2/axis2-admin/ and login with admin as login and axis2 as password
14. Under upload services at http://127.0.0.1:8080/axis2/axis2-admin/upload, upload the aar file generated in above step.
15. upon successful deployment of service, you should see the service under available services. If you are seeing the service to be in FAULT status, check my other post regarding version mismatch to resolve the issue.
16. Click on the service name, to get the WSDL
17. If you have SOAP UI or any other client, you can now test the generated WSDL and the services using the URL
http://127.0.0.1:8080/axis2/services/StockQuoteService?wsdl
Error: org.apache.axis2.deployment.DeploymentException: The following error occurred during schema generation
Posted by phaneendra in Axis2 on January 22, 2012
Problem: Upon trying to deploy an aar file onto Axis2, service will be in fault status and the error log shows
Error: org.apache.axis2.deployment.DeploymentException: The following error occurred during schema generation: samples.quickstart.service.pojo.StockQuoteService at org.apache.axis2.deployment.repository.util.ArchiveReader.processServiceGroup(ArchiveReader.java:150) at org.apache.axis2.deployment.ServiceDeployer.deploy(ServiceDeployer.java:82) at org.apache.axis2.deployment.repository.util.DeploymentFileData.deploy(DeploymentFileData.java:136) at org.apache.axis2.deployment.DeploymentEngine.doDeploy(DeploymentEngine.java:813) at org.apache.axis2.deployment.repository.util.WSInfoList.update(WSInfoList.java:144) at org.apache.axis2.deployment.RepositoryListener.update(RepositoryListener.java:370) at org.apache.axis2.deployment.RepositoryListener.checkServices(RepositoryListener.java:254) at org.apache.axis2.deployment.RepositoryListener.startListener(RepositoryListener.java:364) at org.apache.axis2.deployment.scheduler.SchedulerTask.checkRepository(SchedulerTask.java:73) at org.apache.axis2.deployment.scheduler.SchedulerTask.run(SchedulerTask.java:94) at org.apache.axis2.deployment.scheduler.Scheduler$SchedulerTimerTask.run(Scheduler.java:93) at java.util.TimerThread.mainLoop(Timer.java:512) at java.util.TimerThread.run(Timer.java:462) Caused by: org.apache.axis2.deployment.DeploymentException: The following error occurred during schema generation: samples.quickstart.service.pojo.StockQuoteService at org.apache.axis2.deployment.ServiceBuilder.populateService(ServiceBuilder.java:433) at org.apache.axis2.deployment.repository.util.ArchiveReader.buildServiceGroup(ArchiveReader.java:101) at org.apache.axis2.deployment.repository.util.ArchiveReader.processServiceGroup(ArchiveReader.java:143) … 12 more Caused by: org.apache.axis2.deployment.DeploymentException: The following error occurred during schema generation: samples.quickstart.service.pojo.StockQuoteService at org.apache.axis2.deployment.ServiceBuilder.populateService(ServiceBuilder.java:397) … 14 more Caused by: org.apache.axis2.AxisFault: samples.quickstart.service.pojo.StockQuoteService at org.apache.axis2.AxisFault.makeFault(AxisFault.java:430) at org.apache.axis2.util.Utils.getServiceClass(Utils.java:804) at org.apache.axis2.deployment.util.Utils.fillAxisService(Utils.java:430) at org.apache.axis2.deployment.ServiceBuilder.populateService(ServiceBuilder.java:389) … 14 more Caused by: java.lang.ClassNotFoundException: samples.quickstart.service.pojo.StockQuoteService at org.apache.catalina.loader.WebappClassLoader.loadClass(WebappClassLoader.java:1676) at org.apache.catalina.loader.WebappClassLoader.loadClass(WebappClassLoader.java:1521) at java.lang.Class.forName0(Native Method) at java.lang.Class.forName(Class.java:169) at org.apache.axis2.util.Loader.loadClass(Loader.java:261) at org.apache.axis2.util.Loader.loadClass(Loader.java:229) at org.apache.axis2.util.Utils.getServiceClass(Utils.java:801) … 16 more
Solution:
This is a problem with the java version being used and initially i was setting my java home to jdk1.7, upon setting JAVA_HOME environmental variable to point to jdk1.6 version instead, recreate the aar file and deploy on AXIS2, service will be deployed without any issues and will not be in fault status
Firefox window.focus()
Posted by phaneendra in Browser on January 22, 2012
<body onload=”this.window.focus();” > is failing in Firefox 6.
1. Go to Firefox -> Options -> Content
2. Make sure “Enable JavaScript” is turned on.
3. Next to “Enable JavaScript”, click the “Advanced” button.
4. Make sure that there is a check-mark in the box
[x] Raise or lower windows
How to display hibernate sql parameter values – P6Spy
Posted by phaneendra in Hibernate on January 22, 2012
1. Download P6Spy library
Get the “p6spy-install.jar“, you can download it from
2. Extract it
Extract the p6spy-install.jar file, look for p6spy.jar and spy.properties
3. Add library dependency
Add p6spy.jar into your project library dependency along with commons-dbcp-1.4.jar
4. Modify P6Spy properties file
Modify your database configuration file. You need to replace your existing JDBC driver with P6Spy JDBC driver – ” com.p6spy.engine.spy.P6SpyDriver<!– SPY SETUP–>
<bean id=”dataSource” destroy-method=”close”>
<constructor-arg>
<ref local=”myDataSourceTarget”/>
</constructor-arg>
</bean>
<bean id=”myDataSourceTarget” destroy-method=”close”>
<property name=”driverClassName”>
<value>com.p6spy.engine.spy.P6SpyDriver</value>
</property>
<property name=”url”>
<value>jdbc:oracle:thin:@hostname:port:servicename</value>
</property>
<property name=”username”>
<value>username</value>
</property>
<property name=”password”>
<value>pw</value>
</property>
</bean>”
5. Modify P6Spy properties file
Modify the P6Spy properties file – “spy.properties# useful for debugging sql
module.log=com.p6spy.engine.logging.P6LogFactory
executionthreshold=
outagedetection=false
outagedetectioninterval=
filter=false
include =
exclude =
sqlexpression =
autoflush = true
dateformat=
includecategories=
excludecategories=info,debug,result,batch
stringmatcher=
stacktraceclass=
reloadproperties=false
reloadpropertiesinterval=60
useprefix=false
appender=com.p6spy.engine.logging.appender.FileLogger
logfile = c:\\temp\\spy.log
append=false
log4j.appender.STDOUT=org.apache.log4j.ConsoleAppender
log4j.appender.STDOUT.layout=org.apache.log4j.PatternLayout
log4j.appender.STDOUT.layout.ConversionPattern=p6spy – %m%n
log4j.logger.p6spy=DEBUG,STDOUT
realdriver=oracle.jdbc.driver.OracleDriver”
Change the Log file location
Change the log file location in logfile property, all SQL statements will log into this file.
Windows
logfile = c:/spy.log
*nix
logfile = /srv/log/spy.log
6. Copy “spy.properties” to project classpath
Copy “spy.properties” to your project root folder, make sure your project can locate “spy.properties”, else it will prompt “spy.properties” file not found exception.
7. Done
Run your application and do some database transaction, you will notice all the SQL statements sent from application to database will be logged into a file you specified in “spy.properties”.
Sample log file as following.
insert into stock_transaction (CHANGE, CLOSE, DATE, OPEN, STOCK_ID, VOLUME)
values (?, ?, ?, ?, ?, ?)|
insert into stock_transaction (CHANGE, CLOSE, DATE, OPEN, STOCK_ID, VOLUME)
values (10.0, 1.1, '2009-12-30', 1.2, 11, 1000000)
Conclusion
P6Spy is really useful in reducing the developers’ debugging time. As long as your project is using JDBC driver for connection , P6Spy can fit into it and log all SQL statements and parameter values for you.
Configure EhCache+Spring
Posted by phaneendra in ehCache on September 3, 2011
Inside Spring-Beans.xml
<beans xmlns=”http://www.springframework.org/schema/beans”
xmlns:xsi=”http://www.w3.org/2001/XMLSchema-instance”
xmlns:util=”http://www.springframework.org/schema/util”
xmlns:ehcache=”http://ehcache-spring-annotations.googlecode.com/svn/schema/ehcache-spring”
xsi:schemaLocation=”http://www.springframework.org/schema/beans classpath:org/springframework/beans/factory/xml/spring-beans-2.5.xsd
http://www.springframework.org/schema/util http://www.springframework.org/schema/util/spring-util-2.5.xsd
http://cxf.apache.org/jaxws http://cxf.apache.org/schemas/jaxws.xsd
http://ehcache-spring-annotations.googlecode.com/svn/schema/ehcache-spring
http://ehcache-spring-annotations.googlecode.com/svn/schema/ehcache-spring/ehcache-spring-1.1.xsd”>
<ehcache:annotation-driven cache-manager=”ehCacheManager” />
<bean id=”ehCacheManager”>
<property name=”configLocation” value=”classpath:spring/ehcache.xml” />
</bean>
Inside ehcache.xml
<ehcache>
<defaultCache
maxElementsInMemory=”500″
eternal=”true”
overflowToDisk=”false”
memoryStoreEvictionPolicy=”LFU” />
<cache name=”testCache”
maxElementsInMemory=”50″
timeToLiveSeconds=”900″
eternal=”false”
overflowToDisk=”false”
memoryStoreEvictionPolicy=”LFU” />
</ehcache>
POM
<dependency>
<groupId>com.googlecode.ehcache-spring-annotations</groupId>
<artifactId>ehcache-spring-annotations</artifactId>
<version>1.1.3</version>
</dependency>
com.microsoft.sqlserver.jdbc.SQLServerException: The TCP/IP connection to the host localhost, port 1433 has failed
Posted by phaneendra in SQL Server on August 14, 2011
Problem: com.microsoft.sqlserver.jdbc.SQLServerException: The TCP/IP connection to the host localhost, port 1433 has failed
Solution: Multiple Issues i had while trying to connect to SQL Server
1.
sqljdbc4.jar class library provides support for JDBC 4.0. It includes all of the features of the sqljdbc.jar as well as the new JDBC 4.0 methods.
sqljdbc4.jar class library requires a Java Runtime Environment (JRE) of version 6.0 or later. Using sqljdbc4.jar on JRE 1.4 or 5.0 will throw an exception.
 Note
Notesqljdbc.jar class library provides support for JDBC 3.0.
sqljdbc.jar class library requires a Java Runtime Environment (JRE) of version 5.0. Using sqljdbc.jar on JRE 6.0 will throw an exception when connecting to a database.
Notesqljdbc_auth.dll from the enu\auth\x86 folder of jdbc to C:\Windows\System32Spring RESTful Webservice + JSON
Posted by phaneendra in JSON, REST, Spring on August 14, 2011
1. In the Controller
@RequestMapping(method={RequestMethod.GET,RequestMethod.OPTIONS, RequestMethod.POST} ,value=”/product”,headers = “Accept=application/json”)
public ResponseEntity<ProductBO> getProducts(@RequestParam(“id”) String id, @RequestParam(“type”) String type) {
ProductBO prodBO = new ProductBO();
prodBO = service.getProducts(id,type);
HttpHeaders responseHeaders = new HttpHeaders();
responseHeaders.add(“Access-Control-Allow-Origin”, “*”);
responseHeaders.add(“Access-Control-Allow-Methods”, “GET, OPTIONS, POST”);
responseHeaders.add(“Access-Control-Allow-Headers”, “Content-Type”);
responseHeaders.add(“Access-Control-Max-Age”, “86400”);
return new ResponseEntity<ProductBO>(prodBO, responseHeaders, HttpStatus.OK);
}
2. web.xml
<listener>
<listener-class>org.springframework.web.context.ContextLoaderListener</listener-class>
</listener>
<context-param>
<param-name>contextConfigLocation</param-name>
<param-value>WEB-INF/applicationContext.xml</param-value>
</context-param>
<servlet>
<servlet-name>rest</servlet-name>
<servlet-class>org.springframework.web.servlet.DispatcherServlet</servlet-class>
<load-on-startup>1</load-on-startup>
</servlet>
<servlet-mapping>
<servlet-name>rest</servlet-name>
<url-pattern>/app/*</url-pattern>
</servlet-mapping>
3. rest-servlet.xml
<?xml version=”1.0″ encoding=”UTF-8″?>
<beans xmlns=”http://www.springframework.org/schema/beans”
xmlns:xsi=”http://www.w3.org/2001/XMLSchema-instance”
xmlns:p=”http://www.springframework.org/schema/p”
xmlns:context=”http://www.springframework.org/schema/context”
xsi:schemaLocation=”http://www.springframework.org/schema/beans
http://www.springframework.org/schema/beans/spring-beans.xsd
http://www.springframework.org/schema/context
http://www.springframework.org/schema/context/spring-context.xsd”>
<context:component-scan base-package=”com.spring.controller” />
<bean class=”org.springframework.web.servlet.mvc.annotation.DefaultAnnotationHandlerMapping”/>
<bean class=”org.springframework.web.servlet.mvc.annotation.AnnotationMethodHandlerAdapter”>
<property name=”messageConverters”>
<list>
<!– Support JSON –>
<bean class=”org.springframework.http.converter.json.MappingJacksonHttpMessageConverter”/>
</list>
</property>
</bean>
<bean id=”productView”>
<constructor-arg ref=”jaxbMarshaller” />
</bean>
<!– JAXB2 marshaller. Automagically turns beans into xml –>
<bean id=”jaxbMarshaller”>
<property name=”classesToBeBound”>
<list>
<value>com.xyz.domain.ProductBO</value>
</list>
</property>
</bean>
</beans>
java.lang.ClassNotFoundException: javax.faces.webapp.FacesServlet
Posted by phaneendra in JSF, Maven on July 1, 2011
Problem: Deploying a newly created JSF 2.1 Application on Tomcat 7 and while starting the server, gets the following error, which made me to scratch my head. While working with JSF 1.2, on other IDE’s like MyEclipse, i do not remember coming across this issue.
java.lang.ClassNotFoundException: javax.faces.webapp.FacesServlet
Solution:
I give credit to the author at
http://blog.v-s-f.co.uk/2010/09/jsf-2-1-project-using-eclipse-and-maven-2/
and also i added my own findings in this post.
We need to change the below few files so that the jar files are deployed with the application.
So now open the file org.eclipse.wst.common.component which is in the .settings folder. Delete the lines:
<wb-resource deploy-path=”/WEB-INF/classes” source-path=”/src/test/java” />
<wb-resource deploy-path=”/WEB-INF/classes” source-path=”/src/test/resources” />
Replace them with:
<dependent-module deploy-path=”/WEB-INF/lib”>
<dependency-type>uses</dependency-type>
</dependent-module>
Open .classpath and replace the line: <classpathentry exported=”true” kind=”con” path=”org.maven.ide.eclipse.MAVEN2_CLASSPATH_CONTAINER”/> with:
<classpathentry exported=”true” kind=”con” path=”org.maven.ide.eclipse.MAVEN2_CLASSPATH_CONTAINER”>
<attributes>
<attribute name=”org.eclipse.jst.component.dependency” value=”/WEB-INF/lib”/>
</attributes>
</classpathentry>
Apart from doing the above steps, without doing this step, still throwed the exception for me. So, do this as well, right click on project -> properties -> java build path and look for the tab Libraries. Make sure that JavaSE 1.6 is available. If not, remove the old one (default is 1.4 in eclipse) if any, click Add Library on right and add the JavaSE 1.6.
Navigate to Order and Export and select JavaSE 1.6 along with Maven Dependencies.
After selecting Maven Dependencies, navigate to Project Facets, if you do not happen to see the Project Facets list, close the properties dialog box refresh your project and then revisit the Project Facets.
In Eclipse, .project should look like
<?xml version=”1.0″ encoding=”UTF-8″?>
<projectDescription>
<name>projname</name>
<comment></comment>
<projects>
</projects>
<buildSpec>
<buildCommand>
<name>org.eclipse.wst.jsdt.core.javascriptValidator</name>
<arguments>
</arguments>
</buildCommand>
<buildCommand>
<name>org.eclipse.wst.common.project.facet.core.builder</name>
<arguments>
</arguments>
</buildCommand>
<buildCommand>
<name>org.eclipse.jdt.core.javabuilder</name>
<arguments>
</arguments>
</buildCommand>
<buildCommand>
<name>org.eclipse.wst.validation.validationbuilder</name>
<arguments>
</arguments>
</buildCommand>
<buildCommand>
<name>org.maven.ide.eclipse.maven2Builder</name>
<arguments>
</arguments>
</buildCommand>
</buildSpec>
<natures>
<nature>org.eclipse.jem.workbench.JavaEMFNature</nature>
<nature>org.eclipse.wst.common.modulecore.ModuleCoreNature</nature>
<nature>org.eclipse.jdt.core.javanature</nature>
<nature>org.maven.ide.eclipse.maven2Nature</nature>
<nature>org.eclipse.wst.common.project.facet.core.nature</nature>
<nature>org.eclipse.wst.jsdt.core.jsNature</nature>
</natures>
</projectDescription>
.classpath should look like
<?xml version=”1.0″ encoding=”UTF-8″?>
<classpath>
<classpathentry kind=”src” output=”target/classes” path=”src/main/java”/>
<classpathentry excluding=”**” kind=”src” output=”target/classes” path=”src/main/resources”/>
<classpathentry kind=”src” output=”target/test-classes” path=”src/test/java”/>
<classpathentry excluding=”**” kind=”src” output=”target/test-classes” path=”src/test/resources”/>
<classpathentry kind=”src” path=”src/main/webapp”/>
<classpathentry exported=”true” kind=”con” path=”org.maven.ide.eclipse.MAVEN2_CLASSPATH_CONTAINER”>
<attributes>
<attribute name=”org.eclipse.jst.component.dependency” value=”/WEB-INF/lib”/>
</attributes>
</classpathentry>
<classpathentry exported=”true” kind=”con” path=”org.eclipse.jdt.launching.JRE_CONTAINER/org.eclipse.jdt.internal.debug.ui.launcher.StandardVMType/JavaSE-1.6″/>
<classpathentry kind=”con” path=”org.eclipse.jst.j2ee.internal.web.container”/>
<classpathentry kind=”con” path=”org.eclipse.jst.j2ee.internal.module.container”/>
<classpathentry kind=”output” path=”target/classes”/>
</classpath>
org.eclipse.wst.common.component as
<?xml version=”1.0″ encoding=”UTF-8″?>
<project-modules id=”moduleCoreId” project-version=”1.5.0″>
<wb-module deploy-name=”projname”>
<wb-resource deploy-path=”/” source-path=”/WebContent”/>
<wb-resource deploy-path=”/WEB-INF/classes” source-path=”/src/main/java”/>
<wb-resource deploy-path=”/WEB-INF/classes” source-path=”/src/main/resources”/>
<dependent-module deploy-path=”/WEB-INF/lib”>
<dependency-type>uses</dependency-type>
</dependent-module>
<wb-resource deploy-path=”/WEB-INF/classes” source-path=”/src/main/webapp”/>
<property name=”context-root” value=”projname”/>
<property name=”java-output-path” value=”/projname/target/classes”/>
</wb-module>
</project-modules>
pom.xml for JS2.1 App
<project xmlns=”http://maven.apache.org/POM/4.0.0″ xmlns:xsi=”http://www.w3.org/2001/XMLSchema-instance” xsi:schemaLocation=”http://maven.apache.org/POM/4.0.0 http://maven.apache.org/xsd/maven-4.0.0.xsd”>
<modelVersion>4.0.0</modelVersion>
<groupId>com.proj</groupId>
<artifactId>projname</artifactId>
<version>1.0</version>
<packaging>war</packaging>
<name>clm prowise</name>
<description> </description>
<repositories>
<repository>
<id>maven2-repository.dev.java.net</id>
<name>Java.net Repository for Maven</name>
<url>http://download.java.net/maven/2</url>
<snapshots>
<enabled>false</enabled>
</snapshots>
</repository>
</repositories>
<dependencies>
<dependency>
<groupId>com.sun.faces</groupId>
<artifactId>jsf-api</artifactId>
<version>2.1.0-b03</version>
<scope>compile</scope>
</dependency>
<dependency>
<groupId>com.sun.faces</groupId>
<artifactId>jsf-impl</artifactId>
<version>2.1.0-b03</version>
<scope>compile</scope>
</dependency>
<dependency>
<groupId>javax.servlet</groupId>
<artifactId>jstl</artifactId>
<version>1.2</version>
</dependency>
<dependency>
<groupId>javax.servlet</groupId>
<artifactId>servlet-api</artifactId>
<version>2.5</version>
</dependency>
</dependencies>
<build>
<plugins>
<plugin>
<artifactId>maven-compiler-plugin</artifactId>
<configuration>
<source>1.5</source>
<target>1.5</target>
</configuration>
</plugin>
</plugins>
</build>
</project>
annotations are not supported in -source 1.3
Posted by phaneendra in Maven on July 1, 2011
Problem: I am using maven 3 and while building a war file, i got this error as one of my java class files has annotations.
annotations are not supported in -source 1.3
To avoid this error, add the below plugin to pom.xml
Solution:
<build>
<plugins>
<plugin>
<artifactId>maven-compiler-plugin</artifactId>
<configuration>
<source>1.6</source>
<target>1.6</target>
</configuration>
</plugin>
</plugins>
</build>
Java Memory Profiling using JHat
Posted by phaneendra in Java, jConsole, jHat on July 1, 2011
Problem: How to do memory profiling for a java application
Solution: I have chosen to use jdk inbuilt feature jhat to acheive this.
jhat Utility
The jhat tool provides a convenient means to browse the object topology in a heap snapshot. This tool was introduced in the Java SE 6 release to replace the Heap Analysis Tool (HAT).
The tool parses a heap dump in binary format, for example, a heap dump produced by tomcat or jConsole. There are couple of ways to produce a dump whenever an outOfMemory Exception happens, which i will brief a little later. Once the dump is available, use jhat to analyze the dump and jhat produces a html that contains the all the classes and object instances count and other useful information.
First step would be to set up generating a dump upon an OOM exception that we will use later to be analyzed by jHat
Option 1 to generate dump file: Use JConsole
Once you start jConsole from command prompt as
c:\> jConsole
1. Select Remote Process
2. Enter hostname:JMXPort (JMX need to be setup for your environment to be able to use jConsole) Find out JMXPort from the tomcat instance
3. Enter a userid that has edit access and password.
4. Once connected, Go to the MBeans tab and open:
com.sun.management
HotSpotDiagnostic
Operations
dumpHeap
Fill in ‘testdump.log’ in the ‘String’ inputbox and press ‘dumpHeap’.
Option 2 to generate dump file: Use server settings
Go to your environment and edit tomcatstartup options as
-server -Xms256M -Xmx512M -XX:PermSize=256m -XX:+HeapDumpOnOutOfMemoryError -XX:HeapDumpPath=/tmp/testdump.log -XX:MaxPermSize=256m -Djava.awt.headless=true -Djava.net.preferIPv4Stack=true
Now, we have done our setup to generate a dump file names testdump.log, in one of the above two ways.
Now if at any point during your application, you encounter OOM exception, this log will be generated.
Use jhat tool to visualize the heap
Type jhat command and select a port free to use, otherwise binding exception will occur. To find what port is free, use
netstat -an | grep (port) | grep -i listen
If the port listens, its in use.
jHat itself needs of of heapsize to analyze big dump files, so make sure you set it to 1G or more as available.
C:\Program Files\Java\jdk1.6.0_21\bin>jhat -port 7010 -J-Xmx1G c:\testdump.log
Reading from c:\testdump.log…
java.io.IOException: Map failed
at sun.nio.ch.FileChannelImpl.map(FileChannelImpl.java:758)
at com.sun.tools.hat.internal.parser.MappedReadBuffer.create(MappedReadB
uffer.java:47)
at com.sun.tools.hat.internal.parser.HprofReader.<init>(HprofReader.java
:145)
at com.sun.tools.hat.internal.parser.Reader.readFile(Reader.java:76)
at com.sun.tools.hat.Main.main(Main.java:143)
Caused by: java.lang.OutOfMemoryError: Map failed
at sun.nio.ch.FileChannelImpl.map0(Native Method)
at sun.nio.ch.FileChannelImpl.map(FileChannelImpl.java:755)
… 4 more
File mapping failed, will use direct read
Dump file created Thu Jun 09 14:42:10 EDT 2011
Snapshot read, resolving…
Resolving 5203574 objects…
Chasing references, expect 1040 dots……………………………………..
……………………………………………………………………..
……………………………………………………………………..
……………………………………………………………………..
……………………………………………………………………..
……………………………………………………………………..
……………………………………………………………………..
……………………………………………………………………..
……………………………………………………………………..
……………………………………………………………………..
……………………………………………………………………..
……………………………………………………………………..
……………………………………………………………………..
………………………………
Eliminating duplicate references…………………………………………
……………………………………………………………………..
……………………………………………………………………..
……………………………………………………………………..
……………………………………………………………………..
……………………………………………………………………..
……………………………………………………………………..
……………………………………………………………………..
……………………………………………………………………..
……………………………………………………………………..
……………………………………………………………………..
……………………………………………………………………..
……………………………………………………………………..
…………………………..
Snapshot resolved.
Started HTTP server on port 7010
Server is ready.
Jhat will parse the heap dump and start a web server at port 7000. Connect to Jhat server by pointing your browser to:
And start investigating.
Jhat allows you to see what objects are present in the heap, who has references to those objects, etc.
Look for:
- Instances, but not _classes_.
- Instance counts can be seen at: http://localhost:7010/showInstanceCounts/
- Use “Reference Chains from Rootset” (Exclude weak refs!!!) to see who’s holding the instance.
The above output tells you an HTTP server is started on port 7010 by default. To view this report enter the url http://localhost:7000 or http://your_machine_name:7010 in your web browser.
The default report view contains a list of all the classes. At the bottom of this initial page are the following two key report options:
  Show all members of the rootset
  Show instance counts for all classes
If you select the Show all members of the rootset link, you see a list of the following references because these reference are likely targets for potential memory leaks.
Java Static References Busy Monitor References JNI Global References JNI Local References System Class References |
What you look for here are instances in the application that have references to objects that have a risk of not being garbage collected. This can sometimes occur in the case of JNI if memory is allocated for an object, the memory is left to the garbage collector to free up, and the garbage collector does not have the information it needs to do it. In this list of references, you are mainly interested in a large number of references to objects or objects of a large size.
The other key report is the Show instance counts for all classes. This lists the number of calls to a particular method. The String and Character array objects, [S and [C, are always going to be high on this list, but some objects are a bit more intriguing. Why are there 323 instances of java.util.SimpleTimeZone for example?
  5109 instances of class java.lang.String
  5095 instances of class [C
  2210 instances of class java.util.Hashtable$Entry
  968 instances of class java.lang.Class
  407 instances of class [Ljava.lang.String;
  323 instances of class java.util.SimpleTimeZone
  305 instances of class
        sun.java2d.loops.GraphicsPrimitiveProxy
  304 instances of class java.util.HashMap$Entry
  269 instances of class [I
  182 instances of class [Ljava.util.Hashtable$Entry;
  170 instances of class java.util.Hashtable
  138 instances of class java.util.jar.Attributes$Name
  131 instances of class java.util.HashMap
  131 instances of class [Ljava.util.HashMap$Entry;
  130 instances of class [Ljava.lang.Object;
  105 instances of class java.util.jar.Attributes
|
To get more information on the SimpleTimeZone instances, click on the link (the line beginning with 323). This will list all 323 references and calculate how much memory has been used. In this example, 21964 bytes have been used.
Instances of java.util.SimpleTimeZone class java.util.SimpleTimeZone java.util.SimpleTimeZone@0x004f48c0 (68 bytes) java.util.SimpleTimeZone@0x003d5ad8 (68 bytes) java.util.SimpleTimeZone@0x004fae88 (68 bytes) ..... Total of 323 instances occupying 21964 bytes. |
If you click on one of these SimpleTimeZone instances, you see where this object was allocated.
  Object allocated from:

  java.util.TimeZoneData.<clinit>(()V) :
        TimeZone.java line 1222
  java.util.TimeZone.getTimeZone((Ljava/lang/String;)
	Ljava/util/TimeZone;) :
	TimeZone.java line (compiled method)
  java.util.TimeZone.getDefault(
        ()Ljava/util/TimeZone;) :
	TimeZone.java line (compiled method)
  java.text.SimpleDateFormat.initialize(
        (Ljava/util/Locale;)V) :
	SimpleDateFormat.java line (compiled method)
|
In this example the object was allocated from TimeZone.java. The source to this file is in the standard src.jar file, and on examining this file, you can see that indeed there are nearly 300 of these objects in memory.
  static SimpleTimeZone zones[] = {
   // The following data is current as of 1998.
   // Total Unix zones: 343
   // Total Java zones: 289
   // Not all Unix zones become Java zones due to
   // duplication and overlap.
   //-------------------------------------------
   new SimpleTimeZone(-11*ONE_HOUR,
                  "Pacific/Niue" /*NUT*/),
|
Unfortunately, you have no control over the memory used in this example because it is allocated when the program first requests a default timezone. However, this same technique can be applied to analyzing your own application where you may be able to make some improvements
Where the Application Spends its Time
Again, you can use the -Xrunhprof parameter to get information about the time the application spent processing a particular method.
You can use one of two CPU profiling options to achieve this. The first option is cpu=samples. This option reports the result of a sampling of the running threads of the Java VM to which a statistical count of the frequency of the occurrence of a particular method is used to find busy sections of the applications. The second option is cpu=times, which measures the time taken by individual methods and generates a sorted list ranked as a total percentage of the CPU time taken by the application.
By using the cpu=times option, you should see something similiar to this at the end of the output file
CPU TIME (ms) BEGIN (total = 11080)
                       Fri Jan  8 16:40:59 1999
rank   self   accum   count  trace   method
 1   13.81%  13.81%       1   437   sun/
    awt/X11GraphicsEnvironment.initDisplay
 2    2.35%  16.16%       4   456   java/
    lang/ClassLoader$NativeLibrary.load
 3    0.99%  17.15%      46   401   java/
    lang/ClassLoader.findBootstrapClass
|
If you contrast this with the cpu=samples output, you see the difference between how often a method appears during the runtime of the application in the samples output compared to how long that method took in the times output.
CPU SAMPLES BEGIN (total = 14520)
                   Sat Jan 09 17:14:47 1999
rank  self   accum   count  trace   method
 1    2.93%  2.93%   425    2532    sun/
    awt/windows/WGraphics.W32LockViewResources
 2    1.63%  4.56%   237     763    sun/
    awt/windows/WToolkit.eventLoop
 3    1.35%  5.91%   196    1347    java/
    text/DecimalFormat.<init>
|
The W32LockView method, which calls a native windows lock routine, is called 425 times. So when it is sampled it appears in the active runnings threads because it also takes time to complete. In contrast, the initDisplay method is only called once, but it is the method that takes the longest time to complete in real time.
This utility can help debug unintentional object retention. This term is used to describe an object that is no longer needed but is kept alive due to references through some path from the rootset. This can happen, for example, if an unintentional static reference to an object remains after the object is no longer needed, if an Observer or Listener fails to de-register itself from its subject when it is no longer needed, or if a Thread that refers to an object does not terminate when it should. Unintentional object retention is the Java language equivalent of a memory leak.
svn ignore or exclude target folder
Posted by phaneendra in svn on June 1, 2011
Problem: How to ignore target and other folders during svn synchronization in eclipse
Solution:
First of all, the best practice is not to check in any folders which could be modified outside subversion context e.g. target, logs etc.
To avoid these folders appear every time when you synchronise add them to svn:ignore, usually by right clicking and selecting the target to add to svn:ignore or from project properties.
Maven web resources filtering
Posted by phaneendra in Maven on June 1, 2011
Problem: How to perform maven filtering for resources inside webapp
Solution: To acheive this, we need to add the below plugin inside pom.xml and include the resources that need to be filtered, in this example, its *.html
<!– Enabling and configuring web resources filtering –>
<plugin>
<groupId>org.apache.maven.plugins</groupId>
<artifactId>maven-war-plugin</artifactId>
<version>2.0.2</version>
<configuration>
<webResources>
<resource>
<filtering>true</filtering>
<directory>src/main/webapp</directory>
<includes>
<include>**/*.html</include>
<!– include any other file types as needed –>
</includes>
</resource>
</webResources>
</configuration>
</plugin>
once the resources are filtered, pom specific settings will be available in the html, for example version of the project can be accessed from the html as ${project.version}
JQuery
Posted by phaneendra in JQuery on June 1, 2011
Problem: How to use jquery to set the values of selected dropdown and selected checkboxes inside html/jsp
Solution:
Inside your jsp, add script tag and define functions that will called during the events from dropdown(onchange) and onclick for checkboxes
<script>
var drpdown;
var myArray;
function selectDropdown() {
drpdown = $(“#select-dropdown”).val();
alert(drpdown);
}
function showCheckbox(){
//get checkboxes
myArray = new Array(2);
if ($(‘#n-width:checked’).val() !== undefined)
{
myArray[0] = $(‘#cb1’).text();
alert(myArray[0]);
}
if ($(‘#n-height:checked’).val() !== undefined)
{
myArray[1] = $(‘#cb2’).text();
alert(myArray[1]);
}
}
</script>
once the above script is added in head, define body and a table inside to create dropdown and checkbox elements
<body>
<table>
<tr>
<td>
Select From Dropdown:
</td>
<td>
<select id=”select-dropdown” onchange=”selectDropdown();”>
<option selected=”selected”></option>
<option >OPTION1</option>
<option >OPTION2</option>
</select>
</td>
</tr>
<tr>
<td>
<label for=”r-left” id=”cb1″>CHECKBOX1</label>
</td>
<td>
<input type=”checkbox” id=”n-width” onclick=”showCheckbox();”/>
</td>
</tr>
<tr>
<td>
<label for=”r-left” id=”cb2″>CHECKBOX2</label>
</td>
<td>
<input type=”checkbox” id=”n-height” onclick=”showCheckbox();”/>
</td>
</tr>
</table>
</body>
Upon changing the dropdown, selectDropdown will be called and we are using jquery inside selectDropdown to get the value of teh dropdown. Similarly for checkboxes, showCheckbox will be called and using jquery, i am getting the values for selected checkboxes
Hibernate Criteria setResultTransformer
Posted by phaneendra in Hibernate on June 1, 2011
Problem: How to loop through a resultset with the column alias names defined in the native SQL, instead of accessing the resultset by column index in hibernate
Solution:
Sometimes, accessing the resultset by the names of the columns is much convenient than accessing the result set by index, say a row’s first column as get(0) and second column by get(1).
In this case, when using hibernate, calling setResultTransformer(Criteria.ALIAS_TO_ENTITY_MAP).list(), causes it to return a list of Maps.
For example,
Query query1 = session.createSQLQuery(query.toString()).setParameter(“PRODID”, prodid).setParameter(“PRODTYPE”, prodtype);
//Convert the Query object to a list of maps
List iter1 = query1.setResultTransformer(Criteria.ALIAS_TO_ENTITY_MAP).list();
Map<String,Object> map= new HashMap<String,Object>();
for (Object object : iter1)
{
map= (Map<String,Object>)object;
logger.debug(map.get(“PRODID”));
logger.debug(map.get(“PRODTYPE”));
logger.debug(map.get(“PRODEXP”));
logger.debug(map.get(“PRODCOST”));
}
Axis2M
Posted by phaneendra in Axis2, Axis2M, Maven on May 17, 2011
Axis2M is a utility projects that simplify Axis2 web service development along with Maven. axis2M provide set of Maven artifacts and promote usage of j2ee web application project layout for axis2 development:
Axis2mhas following features.
- quickstart archetype
- provide easy start for Hello world axis2 web service only using few number of Maven commands . Also this genarate standred j2ee project layout for axis 2 peoject, and provide WAR pacakgeing option for both services and modules.
- axis2m:run goal to to run Axis2 simple Http server
- This Maven plug-in facilitates to run Axis2’s simple Http server with Maven, those who familiar with axis2 standard distribution can use same server.
- axis2m:WSDL2Java goal to simplfy code genaration under Maven project
- This is a customized version of Axis2 WSDL2Code maven plug-in; this will generate java codes with minimum number of configuration options and garneted code are compatible with Maven project structure.
- Pre-configuration of axis2 ARR, MAR plug-ins for quickstart archetype.
- Once the project is created using axis2m quickstart archetype axis2 AAR and axis2 MAR maven plug-ins are configured with project layout so that users not required configure POM file again.
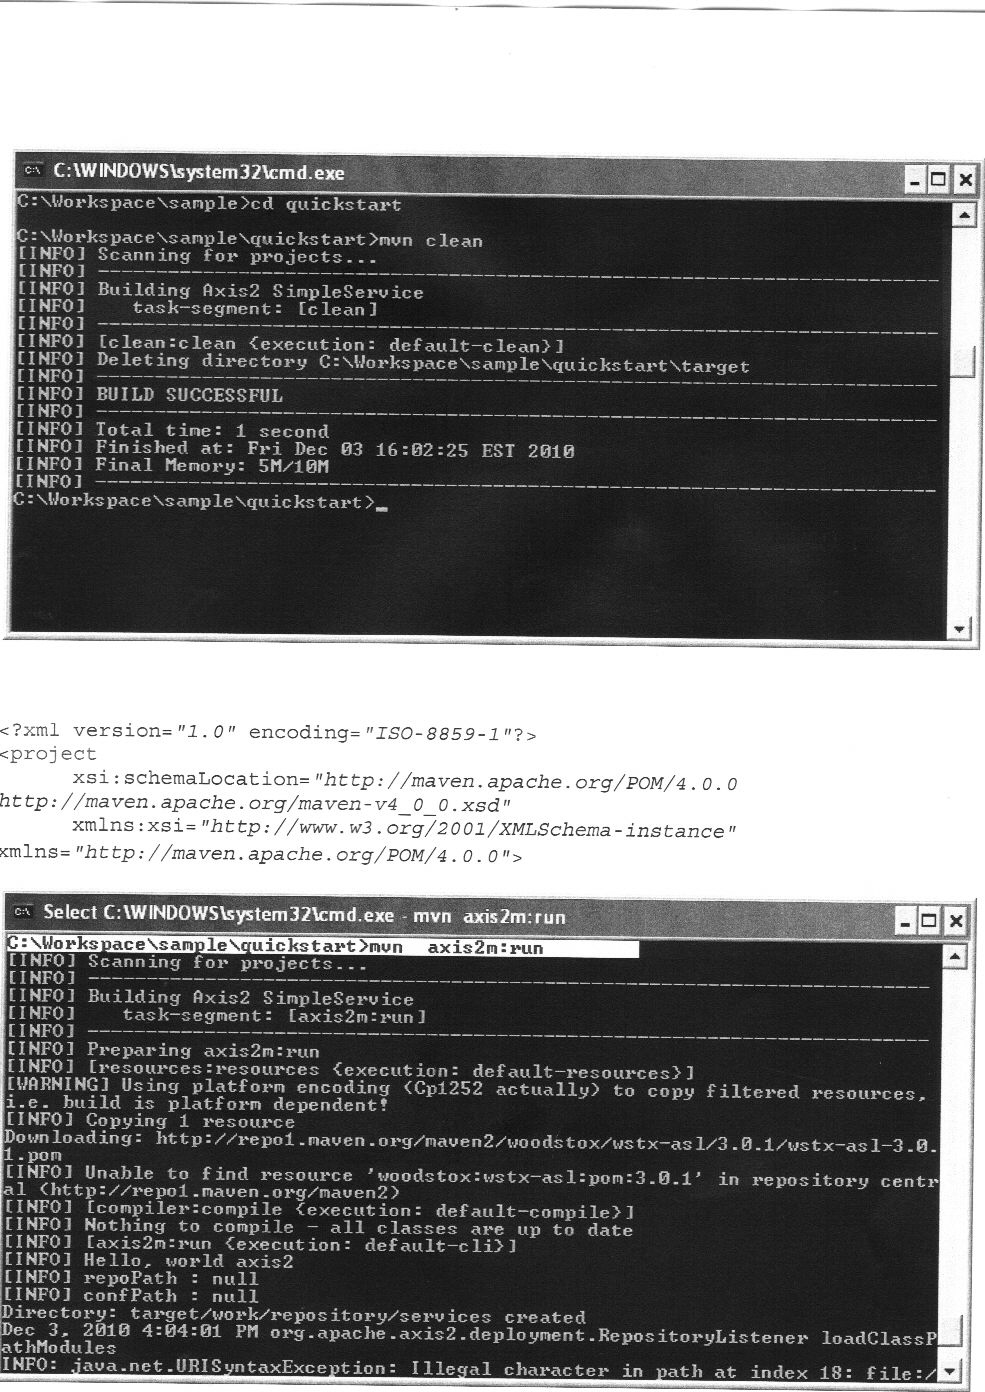
This tutorial briefs the steps involved for Hello world axis2 web service only using few number of Maven command. Before running the below steps, it is assumed that maven is available on your path, if not set up maven on your environmental path.
1. Run maven archetype generate
mvn archetype:generate -DarchetypeCatalog=http://axis2m.sourceforge.net/repo

2. Choose options

3. From eclipse, select IMPORT EXISTINGECTS -> MAVEN -> Exiting Maven Projects
4.Click next, select quickstart:1.0:war
5. 
6. 
7. 
thats it…it was a breeze to get started and see Axis2 in action in a short time..Run the client.java to hit the service.
Storing function name in a variable and invoke that function in javascript
Posted by phaneendra in Javascript on May 11, 2011
Problem: How to store a function name in a javascript variable and invoke that particular function. This post can be classified as a quick tip,
as these kind of scenarios are on need basis
Solution:
Inside JSP:
// Create a javascript array that holds the function names. Our goal is to to use the variables stored in the array and convert them to call a
// function same as the name stored in the variable
<head>
var myArray = new Array(2);
myArray[0] = “onefunction”;
myArray[1]=”anotherfunction”;
</head>
<body onload=”demonstrate(myArray);”
Inside Javascript (.js) file
//Declare a global variable to hold function names
var fnnames;
function demonstrate(functionnames){
var myfn= functionnames;
for(var i =0; i < myfn.length; i++){
eval(myfn[i] + “Hello”); //calling function1 with a parameter “Hello1”, Similarly Calling function2 as well
}
}
//The below functions get called
function onefunction(String param){
alert(Param);
}
function anotherfunction(String param){
alert(Param);
}
java.lang.ClassNotFoundException: org.apache.commons.collections.map.LRUMap
Posted by phaneendra in Hibernate, Junit, Spring on May 2, 2011
Problem: Another issue, this time with JUnit 4 and Spring3,
Hibernate application, where in i encountered the following
issue that
java.lang.ClassNotFoundException:
org.apache.commons.collections.map.LRUMap

Solution:  Add the following dependency to the pom.xml to resolve
java.lang.ClassNotFoundException:
org.apache.commons.collections.map.LRUMap

<dependency>
<groupId>commons-collections</groupId>
 <artifactId>commons-collections</artifactId>
<version>3.1</version> </dependency> package org.springframework.orm.hibernate3 does not exist
Posted by phaneendra in Java, Oracle on May 2, 2011
Problem: Recently i am working on SpringMVC REST +Hibernate application, where in i encountered the following
issue during the integration package org.springframework.orm.hibernate3 does  not exist

 Solution:  Add the following dependency to the pom.xml

 <dependency>
<groupId>org.springframework</groupId>
 <artifactId>spring-orm</artifactId>
<version>${org.springframework.version}</version> </dependency>

Replace the above version with the actual version or specify the version as a property in pom.xml.
Note that, when i was working on Spring 2.5 + Hibernate, the above dependency was not needed,
 but with Spring 3 and Hibernate, to resolve the issue that package org.springframework.orm.hibernate3
does not exist, i added the above dependency ERROR 2003 (HY000): Can’t connect to MySQL server on ‘localhost’ (10061)
Posted by phaneendra in Java, MySQL on March 20, 2016
Problem: While connecting to MySQL from command line on MySQL 5.7, receiving the below error
ERROR 2003 (HY000): Can’t connect to MySQL server on ‘localhost’ (10061)
Solution: To solve this problem, download an older version from the archives, say 5.6.28 and copy the “data” folder under mysql-5.6.28-winx64 to mysql-5.7.11-winx64
http://downloads.mysql.com/archives/community/
Once data folder is copied, open a command prompt in admin mode and navigate to bin directory and uninstall existing MSQL service
C:\mysql-5.7.11-winx64\bin>sc delete MySQL
After existing MySQL service is uninstalled, install MySQL service again
C:\mysql-5.7.11-winx64\bin>mysqld –install
Service successfully installed.
C:\mysql-5.7.11-winx64\bin>mysqld start
now open a commnad prompt and type services.msc, if MSQL service is not running, open the service and start.
Once the sercice is running, test the connection using MySQL Workbench. When trying to connect using workbench, you will receive the below error
Table ‘performance_schema.session_variables’ doesn’t exist
This is because we copied data folder from an older version of mysql to a new version. If you do not copy, mysql wont even start in the first place. To resolve performance_schema table issue, lets upgrade the mysql as shown below.
C:\mysql-5.7.11-winx64\bin>mysql_upgrade -u root -p –force
Enter password:
Checking server version.
Running queries to upgrade MySQL server.
Checking system database.
mysql.columns_priv OK
mysql.db OK
mysql.engine_cost OK
mysql.event OK
mysql.func OK
mysql.general_log OK
mysql.gtid_executed OK
mysql.help_category OK
mysql.help_keyword OK
mysql.help_relation OK
mysql.help_topic OK
mysql.innodb_index_stats OK
mysql.innodb_table_stats OK
mysql.ndb_binlog_index OK
mysql.plugin OK
mysql.proc OK
Cannot execute mojo: resources. It requires a project with an existing po m.xml, but the build is not using one.
Posted by phaneendra in Maven on April 6, 2014
Problem: Cannot execute mojo: resources. It requires a project with an existing po
m.xml, but the build is not using one.
This error simply means there is not pom.xml in the working directory. From the path,where the mvn jetty:run is being run, pom.xml does not exist.
Navigate to the right directory and run the command being tried again should resolve the issue.
The plugin ‘org.apache.maven.plugins:maven-jetty-plugin’ does not exist o r no valid version could be found
Posted by phaneendra in Maven on April 6, 2014
Problem: The plugin ‘org.apache.maven.plugins:maven-jetty-plugin’ does not exist o
r no valid version could be found
Performing mvn jetty:run is throwing this error and infact maven-jetty-plugin does not exist in pom.xml. Instead of adding it every pom.xml that tries to use jetty, instead plug-in is added to settings.xml as below
<pluginGroups>
<!– pluginGroup
| Specifies a further group identifier to use for plugin lookup.
<pluginGroup>com.your.plugins</pluginGroup>
–>
<pluginGroup>org.mortbay.jetty</pluginGroup>
</pluginGroups>

